
Setting up the perfect home for your pet rats doesn’t have to be expensive or difficult—it can be a fun and creative project! A DIY rat cage setup allows you to customize the environment to meet your rats’ needs, giving them a spacious, stimulating, and safe place to live. Rats are intelligent, social animals that require both physical and mental stimulation to stay happy and healthy, and creating a cage that accommodates this is key.
In this guide, I’ll walk you through some exciting DIY rat cage setup ideas that are both cost-effective and highly functional. From platforms and tunnels to toys and bedding, we’ll cover everything you need to create the perfect home for your furry friends.
Key Considerations for Your DIY Rat Cage Setup
Before diving into the DIY setup ideas, let’s go over some basic principles that are essential for your rat’s cage:
1. Space
Make sure your cage is spacious enough to accommodate your rats comfortably. As a general rule, you’ll need at least 2 cubic feet per rat, but more is always better, especially for multiple rats. The cage should be multi-level, allowing for vertical space as rats love to climb.
2. Bar Spacing
Bar spacing should be no wider than ½ inch to prevent escapes or injury. Ensure your DIY cage design accounts for this.
3. Safety
Use safe, non-toxic materials when building your cage. Avoid anything with harmful chemicals, sharp edges, or materials that your rats could chew and ingest (e.g., some plastics).
4. Comfort
Provide plenty of cozy spots for your rats to rest and feel secure. Soft bedding, hammocks, and hiding spaces are essential for rat well-being.
DIY Rat Cage Setup Ideas
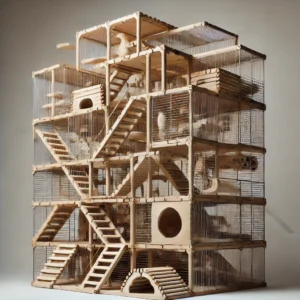
1. Multi-Level Shelves and Ramps
Why it’s great:
Rats are climbers, and a multi-level cage setup is a fantastic way to maximize vertical space. Adding platforms or shelves at varying heights gives your rats room to explore, jump, and exercise.
How to create it:
- Materials Needed: Wooden planks or shelves (preferably untreated wood), metal brackets or screws, and ramps made from wood or wire mesh.
- How to assemble:
- Secure wooden shelves or planks at different heights inside the cage using brackets or screws.
- Add wooden or wire mesh ramps between the levels to allow rats to climb up and down.
- Make sure the shelves are sturdy enough to hold the weight of your rats and any bedding or accessories you place on them.
Pro Tip: Place some tunnels or toys on the shelves to encourage your rats to explore!
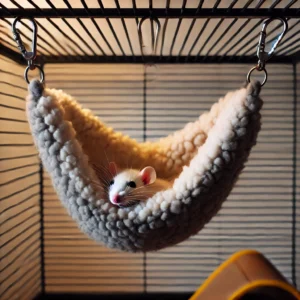
2. DIY Rat Hammocks and Beds
Why it’s great:
Rats love to sleep in cozy, elevated places. Hammocks or fabric beds allow them to snuggle up comfortably while also utilizing vertical space.
How to create it:
- Materials Needed: Fleece or soft cotton fabric (non-toxic), sewing kit or glue, string or hooks to hang the hammock.
- How to assemble:
- Hammock: Cut two pieces of fabric in a square or triangular shape. Stitch or glue the edges together to create a pouch-like hammock, leaving space for threading string or hooks.
- Attach the hammock to the bars of the cage using string or carabiner clips.
- Fabric Bed: Cut fabric into a square and fold it over to create a comfy bed. Place it on a platform or inside a cozy hideout.
Pro Tip: Make sure your hammock is hung at a safe height and secured tightly to prevent it from falling.
3. DIY Tunnels and Hideouts

Why it’s great:
Rats love having places to hide and burrow in, as they are prey animals by nature. Tunnels and hideouts give them a safe, quiet place to retreat when they want to rest or feel secure.
How to create it:
- Materials Needed: PVC pipes, cardboard tubes, or natural materials like coconut shells.
- How to assemble:
- PVC Tunnels: Cut sections of PVC pipe (about 3-4 inches in diameter) to make long, twisty tunnels. Attach them with non-toxic glue or zip ties to form a maze.
- Cardboard Tubes: You can use toilet paper rolls or paper towel tubes to create simple tunnels. Secure them together in a maze-like fashion.
- Coconut Shell Hideouts: Use coconut shells to create natural, safe hideaways. You can cut a hole in the shell and place it on a shelf or the floor of the cage.
Pro Tip: Make the tunnels long and winding to encourage exploration, and use a variety of materials to keep things interesting!
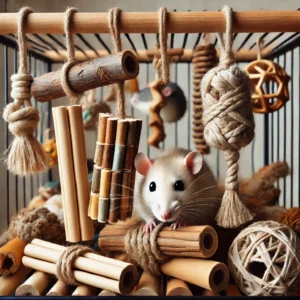
4. DIY Chew Toys
Why it’s great:
Chewing is an essential activity for rats, as it helps keep their teeth healthy. You can make DIY chew toys using safe, natural materials.
How to create it:
- Materials Needed: Wooden sticks, untreated branches, cardboard, paper, and natural fibers like jute or sisal.
- How to assemble:
- Wooden Sticks: Collect untreated wooden sticks (e.g., apple or willow branches) and tie them together with natural twine to create a chewable toy.
- Cardboard Chew Toys: Roll cardboard into small tubes or balls for your rats to chew on.
- Sisal Rope: You can weave sisal or jute rope into knots or hang them from the cage for your rats to gnaw on.
Pro Tip: Keep a variety of textures in the cage for your rats to choose from, such as soft cardboard and harder wood.
5. DIY Water Bottle Holder

Why it’s great:
Rats need fresh water at all times, and a DIY water bottle holder can make it easier for you to keep the water clean and accessible.
How to create it:
- Materials Needed: A metal or plastic clip (or a small metal wire), zip ties, and your rat’s water bottle.
- How to assemble:
- Attach the clip or wire to the bars of the cage and secure it at a height that your rats can easily reach.
- Hang the water bottle from the clip, ensuring that it’s steady and doesn’t tip over.
Pro Tip: Check the water bottle daily to make sure it’s dispensing properly and that the bottle is clean.
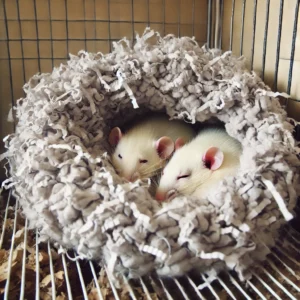
6. Bedding and Nesting Areas
Why it’s great:
Providing soft bedding material is crucial for your rats’ comfort. Bedding should absorb moisture, control odors, and provide a comfortable place for rats to burrow and sleep.
How to create it:
- Materials Needed: Paper-based bedding, shredded paper, or soft fleece fabric.
- How to assemble:
- Create a cozy nesting area in the corner of the cage by piling up bedding materials in a soft, thick layer.
- Place shredded paper or fleece fabric in hideouts and hammocks to make them more comfortable.
Pro Tip: Change bedding frequently to maintain a clean and hygienic environment for your rats.
How to Ensure Your DIY Rat Cage Setup is Safe and Fun
While decorating your rat cage with DIY ideas is a great way to provide a stimulating and comfortable environment, safety should always be your top priority. Here are some tips to keep in mind as you work on your DIY setup:
1. Use Non-Toxic Materials
Always use non-toxic, rat-safe materials. Avoid using paints, dyes, or materials that could be harmful if chewed.
2. Secure All Items
Ensure that all platforms, ramps, and toys are securely fastened. You don’t want any items to fall over and cause injury to your rats.
3. Leave Space for Movement
Don’t overcrowd the cage with too many accessories. Your rats still need plenty of space to move freely, exercise, and socialize.
4. Avoid Small Gaps
Make sure there are no gaps or holes in the cage that could allow your rats to escape or get stuck.
How the RAT Cage Calculator Can Help
While decorating your cage, it’s essential to make sure you have the right size. The RAT Cage Calculator can help you determine the perfect cage size for the number of rats you have. Simply enter the number of rats, and the tool will provide you with the ideal dimensions, ensuring that there is enough space for all your DIY accessories without overcrowding.
By using the RAT Cage Calculator, you can be sure that your DIY setup provides the right amount of space for your rats to live happily, explore, and thrive. Visit RAT Cage Calculator to get started.
Conclusion
Building and decorating a DIY rat cage is a rewarding and creative way to provide your rats with a stimulating environment that meets their needs. From multi-level platforms and climbing structures to cozy hideouts and chew toys, there are endless ways to create a space where your rats can play, explore, and relax. Just remember to keep safety in mind and use rat-safe materials as you design your setup.
And, if you’re unsure if your cage is large enough for all your DIY accessories, use the RAT Cage Calculator to determine the perfect cage size. By providing your rats with enough space, comfort, and enrichment, you’ll ensure they live long, happy lives!